

How To Align Stereo Cameras
The Depth I: Stereo Calibration and Rectification
Hello anybody! Today we will talk about what is stereo camera and how we are using it for estimator vision. By using the code I wrote for y'all, I volition explain how we are calibrating the camera for stereo cameras and calculate a disparity map. I won't get into mathematical details, you can read some OpenCV documents for that. Let'south start!
The reason we can perceive the depth is our beautifully aligned eyes. If you noticed, when we look close objects with i center, we'll see a difference between both perspectives. Just when you expect something far away, like mountains or buildings kilometers away, you won't run across a difference. These differences are automatically candy in our brain and we can perceive the depth! Animals that have eyes aligned far right and far left tin't perceive depth because they don't have mutual perspectives, instead they have a broad-angle perspective. Some of them, like ducks, shake their heads or run fast to perceive depth, it's called structure from motion. We won't embrace this concept, for now, let's focus on a system similar our optics.
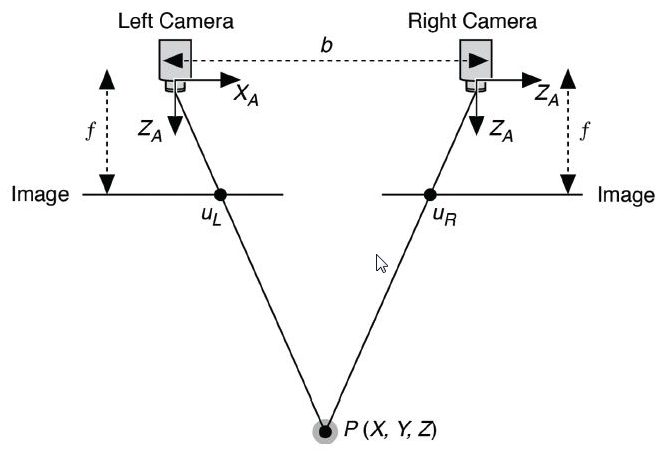
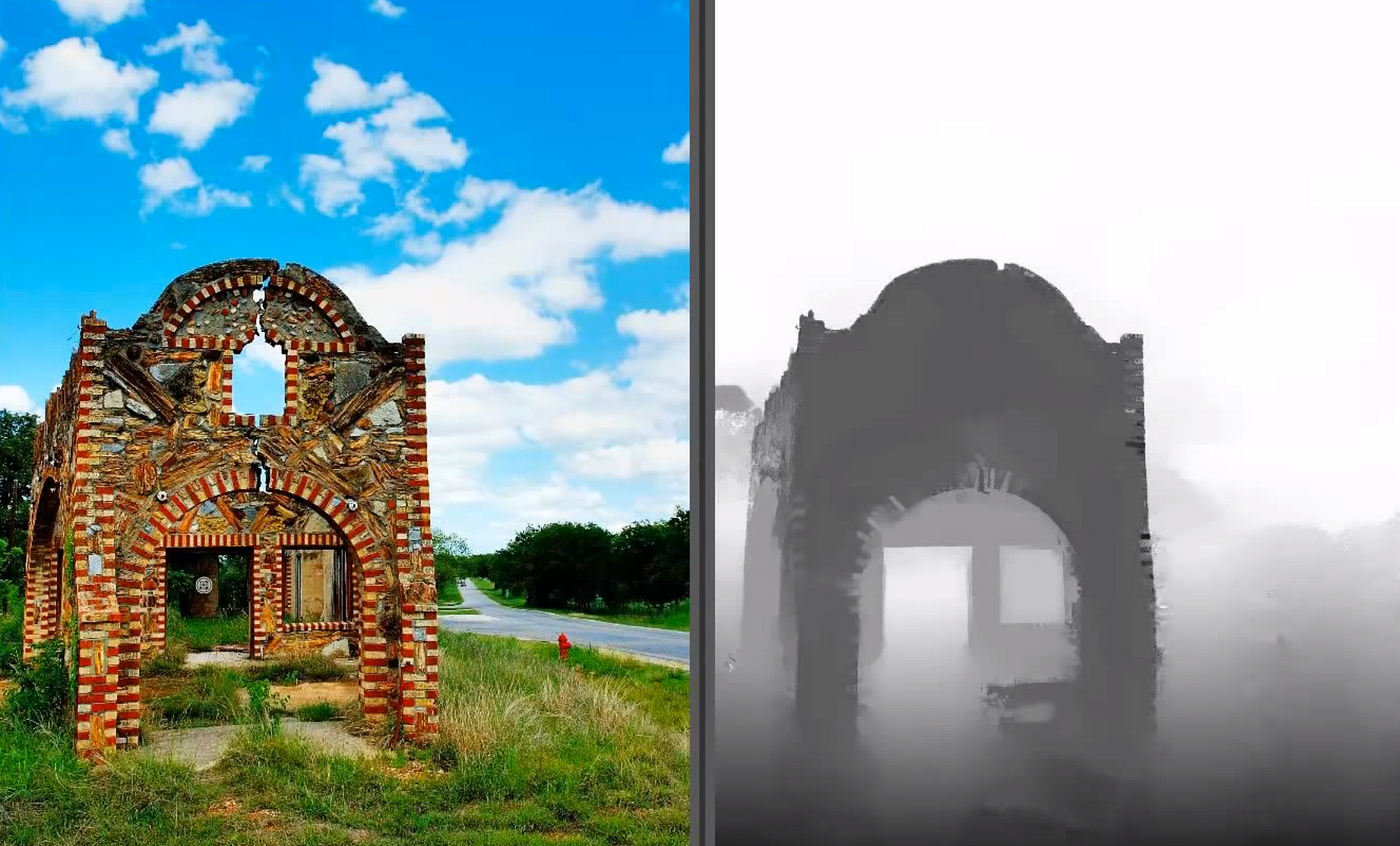
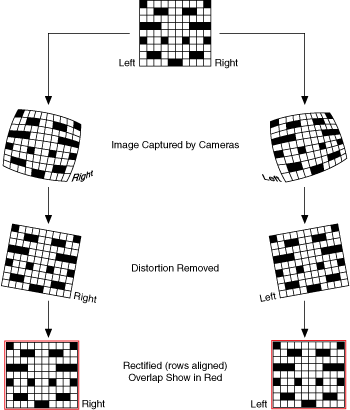
If two cameras aligned vertically, the observed object will be in the aforementioned coordinates vertically(same column in the images), so we can only focus on x coordinates to calculate the depth since close objects will have a higher difference in the x-axis. But to achieve that, we need to calibrate the cameras to fix lens distortions. After the calibration, we need to rectify the system. Rectification is basically scale betwixt ii cameras. If nosotros calibrate and rectify our stereo cameras well, two objects will be on the aforementioned y-axis and observed bespeak P(ten,y) can be found in the same row in the image, P1(x1,y) for the first camera and P2(x2,y) for the second camera. From in that location, information technology's the only deviation between the pixels and depth calculations.
First, mount the stereo cameras to a solid object(ruler, wood or hard plastic materials, etc.) so that the scale and rectification parameters volition piece of work properly. If y'all take Intel Realsense or zed camera, for example, you tin skip all the parts considering Realsense has automobile-calibration and zed is already calibrated as manufactory-default. The side by side step is the calibration of both cameras separately. Yous can follow my calibration guide for that, it's highly recommended for the side by side steps. Stereo cameras required the single calibration first since rectification requires these parameters. Use a chessboard image for the scale and use at least xx images for proficient calculation.
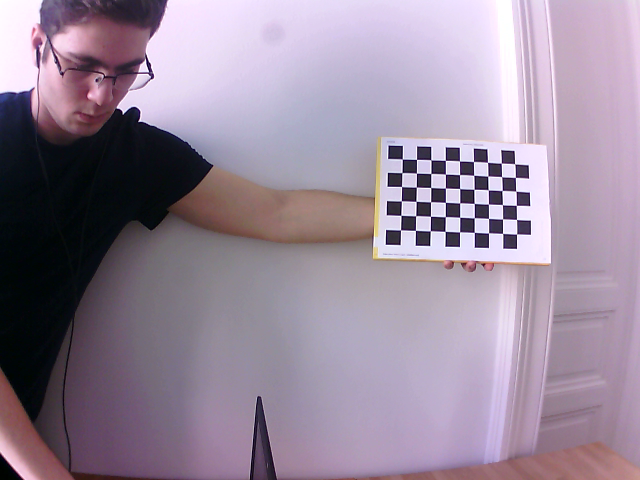
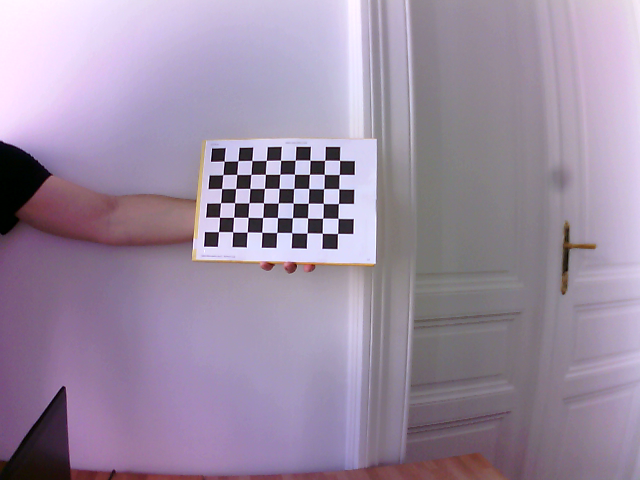
These images will give us the data nosotros need for the cameras. You shouldn't move and become sync images for better calibration. Y'all can use take hold of & retrieve functions to get a much closer timestamp. For taking images, you can use this lawmaking and for the scale, you lot can use this ane. About the codes:
- Stereo scale: Camera calibration for stereo photographic camera set.
- Stereo rectification: Finding a rotation and translation to make them aligned in the y-axis so that each point observed by these cameras will be in the same column in the images from each camera.
OpenCV stereo calibration role:
ret, K1, D1, K2, D2, R, T, East, F = cv2.stereoCalibrate(objp, leftp, rightp, K1, D1, K2, D2, image_size, criteria, flag) We should care about the flags of this office. Let's cover those:
- CV_CALIB_FIX_INTRINSIC: K and D matrices will be fixed. It is the default flag. If you calibrated your photographic camera well, you can fix them so you'll simply get the rectification matrices.
- CV_CALIB_USE_INTRINSIC_GUESS: K and D matrices will be optimized. For this adding, you should give well-calibrated matrices so that the issue will exist improve(possibly).
- CV_CALIB_FIX_PRINCIPAL_POINT: Fix the reference point in the Yard matrix.
- CV_CALIB_FIX_FOCAL_LENGTH: Fix the focal length in the Thousand matrix.
- CV_CALIB_FIX_ASPECT_RATIO: Fixing the aspect ratio.
- CV_CALIB_SAME_FOCAL_LENGTH: Calibrate the focal length and set Fx and Fy the same calibrated result. I am non familiar with this i merely I am sure information technology'southward required for specific stereo setups.
- CV_CALIB_ZERO_TANGENT_DIST: Remove the distortions.
- CV_CALIB_FIX_K1, …, CV_CALIB_FIX_K6: Remove baloney K1 to K6. Really important for experimentation. I am non familiar with the math behind those but the experiments I've made on these helped me a lot.
R, T, E, F coefficients in the result give us the relation betwixt two cameras and we'll use them for rectification:
R1, R2, P1, P2, Q, roi_left, roi_right = cv2.stereoRectify(K1, D1, K2, D2, image_size, R, T, flags=cv2.CALIB_ZERO_DISPARITY, alpha=0.9) In this function, we take only one flag, CALIB_ZERO_DISPARITY and it'due south used to match the y-axis between the images. The alpha value is used to work on the black parts after the transformation since images volition rotate and our size won't change so that some of the images will be black and our original paradigm will exist much smaller. I gear up the value for my camera. The options are:
- alpha=-ane -> Let OpenCV optimize black parts.
- alpha= 0 -> Rotate and cut the epitome so that there will be no black parts. This option cuts the epitome so badly almost of the time, that you won't have a decent high-quality prototype but worth to endeavor.
- alpha= 1 -> Brand the transform only don't cut anything.
- alpha=experimental-> Sometimes nada works for you. This means that you lot should experiment with the values. If it's okay for y'all to have some black part, but the loftier quality image, you can work on the alpha value. I institute the best at 0.9756 for my photographic camera, and so don't lose hope :)
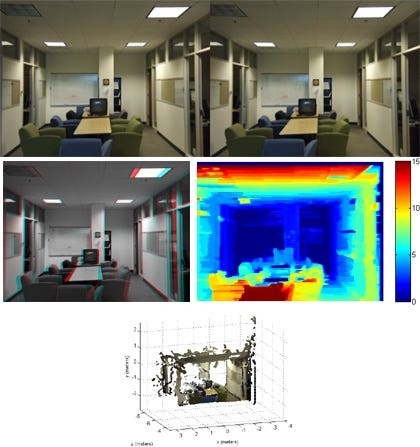
R and P matrices are called rotation and project matrices. R1 and P1 give the rotation and position from first(left) to the 2d(right) photographic camera. R2 and P2 are from 2nd to first. Q matrix is required to go depth map from disparity map. Includes the altitude betwixt cameras, focal length etc. for depth map processing. When the depth values calculated, don't forget that you'll get the coordinates in the same unit you worked with scale. There are a lot of parameters so it's better to double-check everything.
For the results, we should check our test code. If we read the primary part, we'll come across that nosotros use the rectification with undistortion:
leftMapX, leftMapY = cv2.initUndistortRectifyMap(K1, D1, R1, P1, (width, height), cv2.CV_32FC1) left_rectified = cv2.remap(leftFrame, leftMapX, leftMapY, cv2.INTER_LINEAR, cv2.BORDER_CONSTANT) rightMapX, rightMapY = cv2.initUndistortRectifyMap(K2, D2, R2, P2, (width, superlative), cv2.CV_32FC1) right_rectified = cv2.remap(rightFrame, rightMapX, rightMapY, cv2.INTER_LINEAR, cv2.BORDER_CONSTANT)
Information technology means that initUndistortRectifyMap office both undistorts and rectifies the images. For the left photographic camera, we employ K1(camera matrix) and D1(distortion matrix) to undistort and R1(left to correct rotation) and P1(left to right project matrix) to rectify. After the transformation is given to remap, nosotros'll get the rectified images. We'll to the same 1 for the correct camera and the first part is done! Summarizing the process:
That'south all nigh stereo calibration and rectification. We'll encompass the disparity map calculation in the side by side blog!
Resource:
- http://zone.ni.com/reference/en-XX/help/372916P-01/nivisionconceptsdita/guid-c9c3535b-faf7-4ade-9166-513a49d1b90a/
- https://world wide web.google.at/search?q=depth+map&source=lnms&tbm=isch&sa=X&ved=0ahUKEwjlqIq1xsjeAhUkglwKHahhDVIQ_AUIDigB&biw=1536&bih=732#imgrc=o7eiUTU5f3tKpM:
- https://world wide web.mathworks.com/discovery/stereo-vision.html
- https://docs.opencv.org/3.0-beta/modules/calib3d/doc/camera_calibration_and_3d_reconstruction.html
Source: https://python.plainenglish.io/the-depth-i-stereo-calibration-and-rectification-24da7b0fb1e0
Posted by: williamsteres1992.blogspot.com
0 Response to "How To Align Stereo Cameras"
Post a Comment