

How Do You Make A Pinhole Camera
The "camera obscura" or night chamber-manner pinhole photographic camera has been effectually since the fourth century B.C. The first imaging devices were pinhole cameras. Pinhole photography is the foundation of modern photographic processes. Edifice and using your own camera is experiencing photography in its purest form.
Using a pinhole camera – or at least understanding the principles behind it – also makes a big impact on your agreement of photographic terms, technique, and settings. Casting aside the latest equipment and returning to the simplicity of photography'southward historic roots is 1 of the best ways to acquire.
You can build a simple pinhole camera from just most anything, even your modern DSLR. I recommend considering a few other methods start. Let's showtime with the basic principles.
Pinhole Photographic camera Basics
It starts with a photographic camera obscura, a light-tight sleeping accommodation with a small round opening facing a subject. The sleeping room can be small – like a shoe box – or it can be equally large every bit an unabridged room.
Try this out: Discover a room in your home with a window that you can make dark during the daytime. Black out the windows with paper and create a pocket-sized circular opening that allows a dime or quarter-sized amount of light to enter the room. The scene exterior the window will project upside down into the dark room and onto the opposite wall.
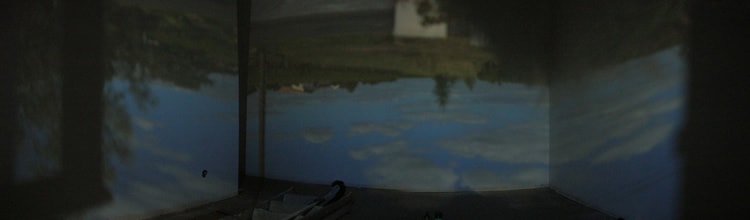
image by david p.
This is exactly what happens when you open up the shutter on a camera. In an SLR-style camera, the epitome passes through the aperture and a mirror reflects the epitome to the viewfinder.
A pinhole camera offers many of the same exposure choices equally an SLR. Y'all can pick aperture size (f-terminate), how long you betrayal your image (shutter speed), and the distance between the discontinuity and calorie-free sensitive surface (focal length).
Some of these choices are fabricated when you programme and build the camera – they are prepare in rock during the creation process. When it comes time to take a picture, you usually but get to pick shutter speed.
Building a Pinhole Camera and Using Photographic Paper for Film
Building a pinhole camera and developing your own prints is a simple and inexpensive style to get into traditional darkroom photography while providing a process for understanding photo principles. You don't need to spend a fortune to build a pinhole photographic camera and develop black and white negatives using photo paper. Here are the supplies you need:
For the Camera:
- Shoebox or similar container
- Blackness paint
- Electric tape
- Tin foil
- Sewing needle
To Develop Prints:
- Photographic Paper (Illford Multigrade Resin Coated Paper)
- Paper Developer (Dektol)
- Fixer (Kodak Logroller)
- Plastic Trays for Developing
- Safelight (CPM Delta)
The first step is to make a low-cal-tight box. I used a shoebox. Paint the box black with spray paint and seal information technology with electrical tape. Create a surface to hold light sensitive fabric. This surface can but be the dorsum of the box. I used a piece of cardboard positioned virtually five inches from the aperture of my photographic camera. In my pinhole camera, the cardboard motion-picture show holder is movable – I will explain why in a infinitesimal.
Tin foil makes a skillful aperture opening. Cutting a foursquare pigsty, tape a square slice of tin foil over information technology and punch a pigsty in the heart of the foil using a needle. You don't want an aperture that is too small. The size of your aperture volition determine how long it takes to expose your epitome.
After you brand your pinhole, cover information technology with a piece of electrical tape that yous can remove afterward. This is your shutter.
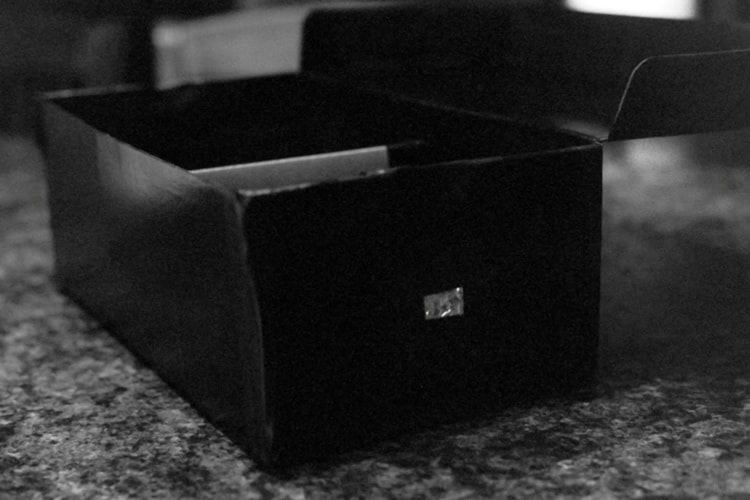
This is my finished shoebox pinhole camera.
My pinhole camera has an adjustable focal length. Moving the light sensitive fabric closer to the aperture volition increment the field of view – the image volition become "wider." Moving it toward the back of the photographic camera will create a telephoto effect – the field of view will decrease.
Creating a "normal" image requires a distance between the movie and aperture equal to the size of the film you apply. If yous use five×seven newspaper, a distance of 7 inches from the paper to the aperture will produce a "normal" field of view (what we used to call 50mm in the days of 35mm film).
Loading a Pinhole Camera with Photographic Newspaper
The easiest method of creating an epitome is with black and white photographic paper. You volition want a resin coated paper (it dries faster). Illford Multigrade Resin Coated Paper is a adept choice. You can besides utilize canvas film, but you won't be able to load the camera under a blood-red light and the processing instructions will be different.
You need a room that is 100% night to load the camera. Blackness and white photographic newspaper does non react to specific frequencies of red calorie-free—yous can use ruddy CPM Delta bulbs or you tin can buy a photographic safelight.
After you take your room completely night and the prophylactic light on, open up the box of photographic paper, trim it to fit your film holder and place a canvas in the photographic camera. The emulsion side needs to be facing the aperture. On the Ilford RC paper, the emulsion side feels sleeky. Tape the paper down so information technology doesn't move around.
Earlier you leave your darkroom, be certain that the paper is sealed in its light-tight box, the chapeau is on your camera, and the electrical tape shutter is in place over the aperture.
Exposing Photographic Paper
Place your camera on a apartment, still surface in front end of a subject and open the shutter (remove the tape in front end of the aperture). Exposure time varies based on light conditions and the size of your aperture. Start with xxx seconds exposure time. Open the shutter, time 30 seconds, and place the shutter dorsum on the camera. View the results later evolution and adjust accordingly. If your paper is nighttime or completely black later on you develop, your exposure time is too long (over exposed).
Developing Paper
Purchase programmer and fixer. Follow the instructions to mix them. Usually you have to use warm water to deliquesce fixer so exist sure to allow it absurd to room temperature before using.
Line up 3 plastic bins or trays in the light-tight room y'all used to load your camera. Developer goes in the first tray, water in the second tray (normally stop bath goes here), and fixer in the tertiary tray. With the room dark and a safe light on, open the camera, remove the newspaper from the holder and process past placing the newspaper in the developer. Move the print in the developer for one-2 minutes.
You should see an paradigm form on the paper. If no epitome appears, you need to increment exposure fourth dimension. Go dorsum to foursquare one, reload your camera and keep the shutter open longer.
Keep the light off. Rinse the negative in the water tray and transfer to the third tray with fixer. Yous can turn the normal room lights on later 1 to 2 minutes. Fix for effectually five minutes and rinse the paper for 15 minutes in running water.
The result of a properly exposed pinhole photo using photo newspaper volition be a negative image. Here is an case from my pinhole photographic camera:
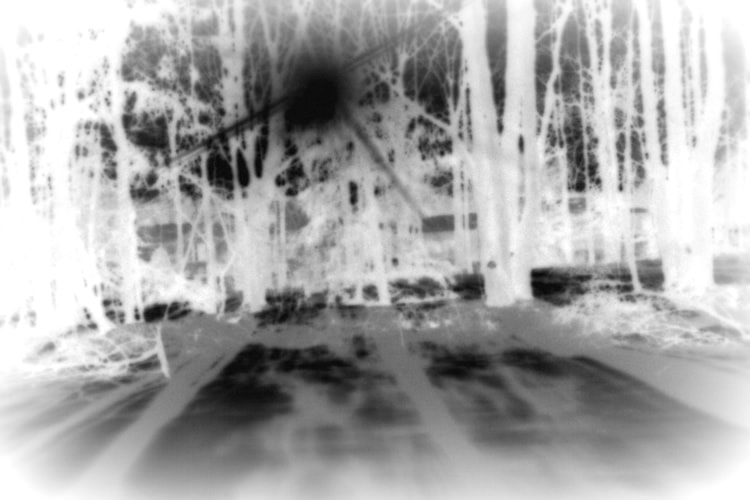
A pinhole negative image of trees and the sun in my yard.
Utilize Your DSLR for Pinhole Photos
Pinhole photography doesn't have to involve developing trays, photographic newspaper, or film processing. You can become a pinhole event from any camera that has a detachable lens. The easiest way is to purchase a custom pinhole lens for your photographic camera. Holga makes a pinhole lens for Canon and Nikon mounts. If you want to be creative, you can besides drill a small hole in a body cap. This method is definitely less work.
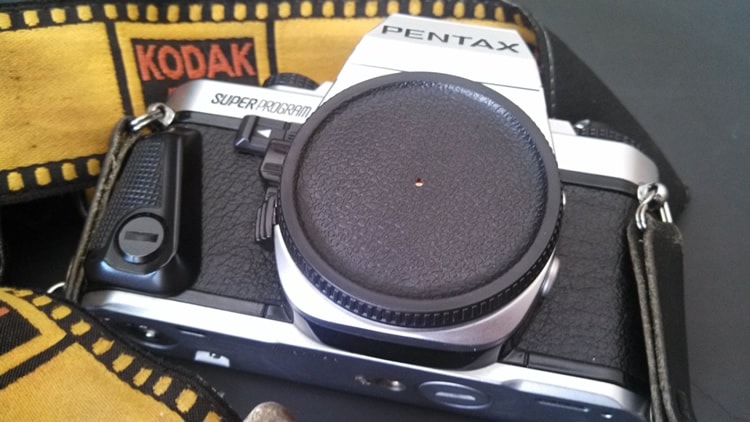
This is my Pentax Super Programme with a pinhole body cap.
I recommend building your ain pinhole photographic camera and developing negatives from black and white photo paper. It's a fun project and you lot larn a lot about photography. Using your SLR is possible – you just need to get a body cap and drill a small pigsty. With a DSLR pinhole camera the results are instant and you acquire like principles.
No matter how you practice information technology you are bound to learn something by reducing the complication of photography to a few bones exposure concepts.
Source: https://contrastly.com/pinhole-camera/
Posted by: williamsteres1992.blogspot.com
0 Response to "How Do You Make A Pinhole Camera"
Post a Comment